
Restore Old Context Menu Windows 11 (Easy Step-by-Step Guide)
When I upgraded to Windows 11, the first thing that annoyed me was the right-click menu. I right-clicked a file expecting to see Copy, Paste, Rename, and Properties right there…

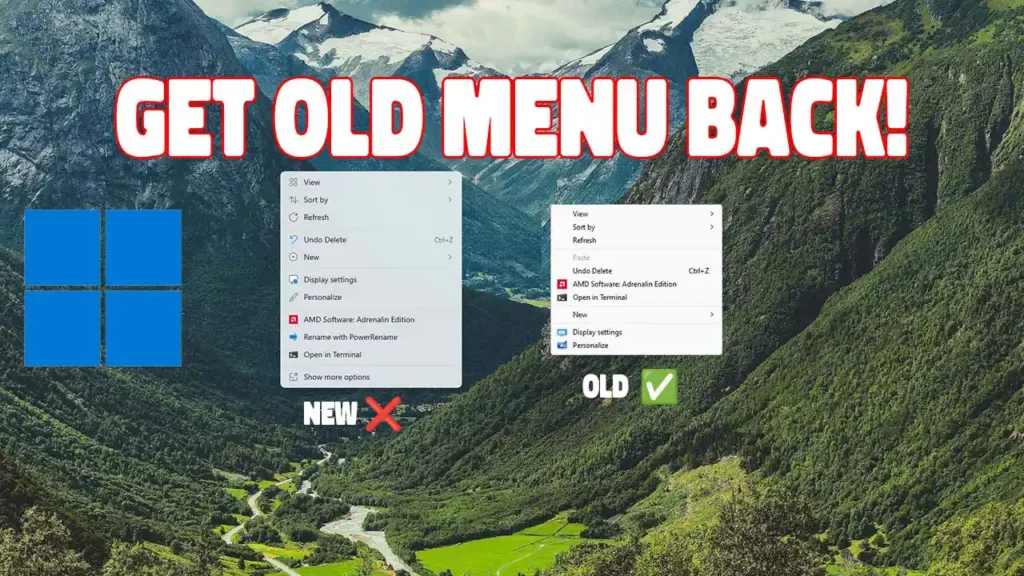
When I upgraded to Windows 11, the first thing that annoyed me was the right-click menu.
I right-clicked a file expecting to see Copy, Paste, Rename, and Properties right there — like I had for years. Instead, I got a shortened menu with a few icons and a “Show more options” link at the bottom. Every single time, one extra click. It sounds small. After a week of heavy file work — organising folders, renaming documents, copying files between drives — those extra clicks add up to real frustration.
There is a quick fix. It takes about two minutes and uses one Registry command. I have done this on my own machine and walked several students through it. Here is how.
Why the Windows 11 Right-Click Menu Feels Slower
Microsoft redesigned the context menu for Windows 11 to look cleaner. The idea was to reduce clutter by hiding less common options behind “Show more options.” The problem is that many of those “less common” options — like Rename, Properties, and the full Copy/Paste/Cut set — are things people actually use every day.
If you are a student handling assignments, an office worker managing documents, or anyone who spends time in File Explorer, the classic menu is simply faster. Everything is visible immediately. No extra click. No waiting for a submenu to load.
The Fix: Restore the Classic Right-Click Menu
This works on all versions of Windows 11, including the 2025 and 2026 updates. It modifies one Registry key — nothing dangerous, nothing that affects other Windows features.
Step 1: Open Command Prompt as Administrator
- Click the Start button or press the Windows key.
- Type cmd in the search box.
- Right-click Command Prompt and select Run as administrator.
- If Windows asks for permission, click Yes.
Step 2: Run the Registry Command
Copy and paste this exact line into Command Prompt, then press Enter:
reg.exe add HKCU\Software\Classes\CLSID\{86ca1aa0-34aa-4e8b-a509-50c905bae2a2}\InprocServer32 /f /veYou should see a message saying “The operation completed successfully.” If you see an error, make sure you copied the entire command — including the curly braces — without missing any characters.
Step 3: Restart Windows Explorer
You do not need to restart your whole computer. Just restart Windows Explorer:
- Press Ctrl + Shift + Esc to open Task Manager.
- Scroll down to find Windows Explorer in the list.
- Right-click it and select Restart.
Your screen may flicker briefly. That is normal. Once it settles, right-click any file or folder — you should see the classic full context menu immediately.
How to Switch Back to the New Menu
If you ever want to return to the Windows 11 default, run this command in an Administrator Command Prompt, then restart Explorer again:
reg.exe delete HKCU\Software\Classes\CLSID\{86ca1aa0-34aa-4e8b-a509-50c905bae2a2} /fThis removes the key you added. Everything goes back to the way it was.
Troubleshooting
Nothing changed after running the command? Double-check that you ran Command Prompt as administrator. If you opened it normally, the command cannot write to the Registry and will silently fail.
Got an “access denied” error? Your user account may not have administrator rights. Try logging into an administrator account and running the command from there.
Command not recognized? You probably mistyped something. Copy the entire line again — including reg.exe add at the start — and paste it carefully.
Is This Worth Doing?
If you right-click files more than a few times a day, yes. The time saved is small per click, but it compounds quickly — especially if you do file-heavy work like organizing documents, renaming batches of photos, or managing project folders.
It is also one of those small customizations that makes your machine feel like yours. Not Microsoft’s idea of what yours should look like.
And if you are still getting comfortable with Windows generally, removing unnecessary friction like hidden menu items helps you focus on the actual work instead of fighting the interface.
Prefer watching a walkthrough? Here is a video covering the same steps:
Restore Old Context Menu Windows 11 — Video Tutorial
Hi, I’m Ovadia, the founder of Ovateq. I’m passionate about technology, digital skills, and helping people learn practical tools that can improve their careers, businesses, and everyday lives. Through Ovateq, I create beginner-friendly tutorials and educational content focused on Microsoft Office, digital literacy, website development, and modern tech skills. My goal is to make technology easier to understand and more accessible for everyone.